Gathering Information with theHarvester

Overview
In this article, I want to talk about the passive information gathering tool theHarvester. theHarvester is a relatively easy to use program for gathering information about a target. This program is gathering information like email addresses, subdomains, hosts, employees of a company, open ports, banners from different sources, like Google (Dorks), Bing, Linkedin, Shodan, and so on. I’m using this program almost on a weekly basis, and it’s very useful when you are conducting a penetration test, cybersecurity assessment, bug bounty, and so on.
theHarvester is being used by ethical-hackers and non ethical-hackers
theHarvester comes pre-installed on the most penetration testing Linux distributions, like Linux Kali and ParrotOS. It’s also supporting other operating systems. Let’s get started!
theHarvester on Github: https://github.com/laramies/theHarvester How to install theHarvester: https://github.com/laramies/theHarvester/wiki/Installation theHarvester on Gitlab: https://gitlab.com/kalilinux/packages/theharvester
theHarvester
Configuring the APIs
Some modules of theHarvester are requiring an API. I advise you to use these APIs to get the most out of this tool. This modules are requiring a API:
| Module | Free API | Purpose |
| Bing | Yes | Search engine from Microsoft |
| GitHub | Yes | To search through Github repo’s for information |
| Hunter | Yes | Connecting email addresses to people |
| Intelx | Yes | Search engine |
| Pentest Tools | No | Pentesting Platform |
| SecurityTrails | Yes | Explores historical data from any internet asset |
| Shodan | Yes | Search engine for the Internet of Things (IoT) |
| Spyse | No | Cybersecurity search engine |
The APIs need to be configured in the api-keys.yaml file. When you’re working on an operating system with theHarvester pre-installed, you can find this file in the /etc/theHarvester location. When you’ve cloned the GitHub repository you can find the file in the directory where the file theHarvester.py is located.
1
2
3
4
5
6
7
8
9
10
11
12
13
14
15
16
17
18
19
20
21
22
23
24
25
26
27
apikeys:
  bing:
    key:

  github:
    key:

  hunter:
    key:

  intelx:
    key:

  pentestTools:
    key:

  projectDiscovery:
    key:

  securityTrails:
    key:

  shodan:
    key:

  spyse:
    key:
Parameters of theHarvester
In the overview section, I’ve done a little explanation about the capabilities of theHarvester. Actually, this program starts with harvesting email addresses, and now you can do so much more with this program. After the installation, the program can be started.
When theHarvester comes pre-installed, you can just start the program by typing in this command:
1
theharvester --help
If you are using an Microsoft operating system or macOS, you can just launching the Python version of the program.
1
python3 theHarvester.py --help
After starting theHarvester with the –help flag, the following is shown.
1
2
3
4
5
6
7
8
9
10
11
12
13
14
15
16
17
18
19
20
21
22
23
24
25
26
27
28
29
30
31
32
33
34
35
36
37
38
39
40
41
42
43
44
45
46
47
48
49
50
51
52
53
54
55
56
*******************************************************************
*  _   _                                            _             *
* | |_| |__   ___    /\  /\__ _ _ ____   _____  ___| |_ ___ _ __  *
* | __|  _ \ / _ \  / /_/ / _` | '__\ \ / / _ \/ __| __/ _ \ '__| *
* | |_| | | |  __/ / __  / (_| | |   \ V /  __/\__ \ ||  __/ |    *
*  \__|_| |_|\___| \/ /_/ \__,_|_|    \_/ \___||___/\__\___|_|    *
*                                                                 *
* theHarvester 3.2.0                                              *
* Coded by Christian Martorella                                   *
* Edge-Security Research                                          *
* cmartorella@edge-security.com                                   *
*                                                                 *
*******************************************************************


usage: theHarvester.py [-h] -d DOMAIN [-l LIMIT] [-S START] [-g] [-p] [-s]
                       [--screenshot SCREENSHOT] [-v] [-e DNS_SERVER]
                       [-t DNS_TLD] [-r] [-n] [-c] [-f FILENAME] [-b SOURCE]

theHarvester is used to gather open source intelligence (OSINT) on a company
or domain.

optional arguments:
  -h, --help            show this help message and exit
  -d DOMAIN, --domain DOMAIN
                        Company name or domain to search.
  -l LIMIT, --limit LIMIT
                        Limit the number of search results, default=500.
  -S START, --start START
                        Start with result number X, default=0.
  -g, --google-dork     Use Google Dorks for Google search.
  -p, --proxies         Use proxies for requests, enter proxies in
                        proxies.yaml.
  -s, --shodan          Use Shodan to query discovered hosts.
  --screenshot SCREENSHOT
                        Take screenshots of resolved domains specify output
                        directory: --screenshot output_directory
  -v, --virtual-host    Verify host name via DNS resolution and search for
                        virtual hosts.
  -e DNS_SERVER, --dns-server DNS_SERVER
                        DNS server to use for lookup.
  -t DNS_TLD, --dns-tld DNS_TLD
                        Perform a DNS TLD expansion discovery, default False.
  -r, --take-over       Check for takeovers.
  -n, --dns-lookup      Enable DNS server lookup, default False.
  -c, --dns-brute       Perform a DNS brute force on the domain.
  -f FILENAME, --filename FILENAME
                        Save the results to an HTML and/or XML file.
  -b SOURCE, --source SOURCE
                        baidu, bing, bingapi, bufferoverun, certspotter,
                        crtsh, dnsdumpster, duckduckgo, exalead, github-code,
                        google, hackertarget, hunter, intelx, linkedin,
                        linkedin_links, netcraft, otx, pentesttools,
                        projectdiscovery, qwant, rapiddns, securityTrails,
                        spyse, sublist3r, threatcrowd, threatminer, trello,
                        twitter, urlscan, virustotal, yahoo
Let’s walk through the possibilities.
-d <DOMAIN>, –domain <DOMAIN>
This is the entry point of your search. Here you can specify the domain name or company name or your target.
-l <LIMIT> –limit <LIMIT>
The default search and output is a maximum of 500 results. If you want to limit your results, you can specify an integer to meet your needs. The fewer results the faster your search.
-S START, –start START
The default displaying the results is from 0. If you want to start displaying the results from a specific amount, you can specify it with this parameter.
-g, –google-dork
theHarvester is using Google Dorks search queries. The Google Dorks searches are places in the ‘/wordlists/dorks.txt’ file, you can add more Google dorks searches if you want to this file.
-p, –proxies
If you want to hide yourself behind a proxy, like SOCK5, you can specify this parameter to enable the proxy. The proxy settings needs to be defined in the proxies.yaml file.
-s, –shodan
Use shodan to query for the discovered hosts. This gives you insights into possible open ports or vulnerabilities on the hosts.
–screenshot SCREENSHOT
If you want that theHarvester is making screenshots of resolved domains, you can use this parameter. You need to specify the output directory where theHarvester need to store the images.
-v, –virtual-host
This verifies the specified hostname through DNS resolution and checks for virtual hosts.
-e DNS_SERVER, –dns-server DNS_SERVER
If you want to use a different DNS-server for the lookups, you can specify here the IP-address of the DNS server.
-t DNS_TLD, –dns-tld DNS_TLD
Some companies have more Top Level Domains. If you want that theHarvester is trying to discover them all, you can set this parameter to True. theHarvester is using a TLD dictionary.
-r, –take-over
This parameter performs a check if the domain is vulnerable for take over.
-n, –dns-lookup
Reverse Lookup if the found IP-addresses in order to find the hostnames.
-c, –dns-brute
This parameter will run a dictionary brute-force enumeration.
-f FILENAME
To save the results in a HTML file, you can define in this parameter the path and filename.
-b SOURCE
Define a source where theHarvester must performing a investigation on the specified domain.
How to use theHarvester?
Now we know how to configure the APIs, which parameters we can use to conduct the research. Let’s do an example of an investigation. In this example, we will use the domain microsoft.com, from the company Microsoft Corporation. We are going to search on Google -b google, and we will limit the results to 100 -l 100.
1
python3 theHarvester.py -d microsoft.com -l 100 -b google
The results are showing some hosts, which are belonging to the company Microsoft. There will probably be many more subdomains on the domain microsoft.com, and with the -c parameter we can perform a subdomain brute-force.
1
python3 theHarvester.py -d microsoft.com -l 100 -b google -c
Here we can see the power of theHarvester. The are many subdomains found belonging to the domain microsoft.com. Microsoft has a bug bounty program, the next step can be running this subdomains against Shodan to enumerate the open ports and maybe some known vulnerabilities.
The next powerful part of theHarvester is that it can find the email addresses of employees working for an organization. Recently this was very useful for me in reporting after I’ve found a vulnerability in an organization. This organization was not part of a bug bounty program, and with theHarvester, I could fairly easily find a lot of email addresses of employees, so I could notify them by email of my findings.
For this example, I will use the domain pvv.nl. This is a political party in The Netherlands, and I want to find out the email addresses of the employees.
1
python3 theHarvester.py -d pvv.nl -b google
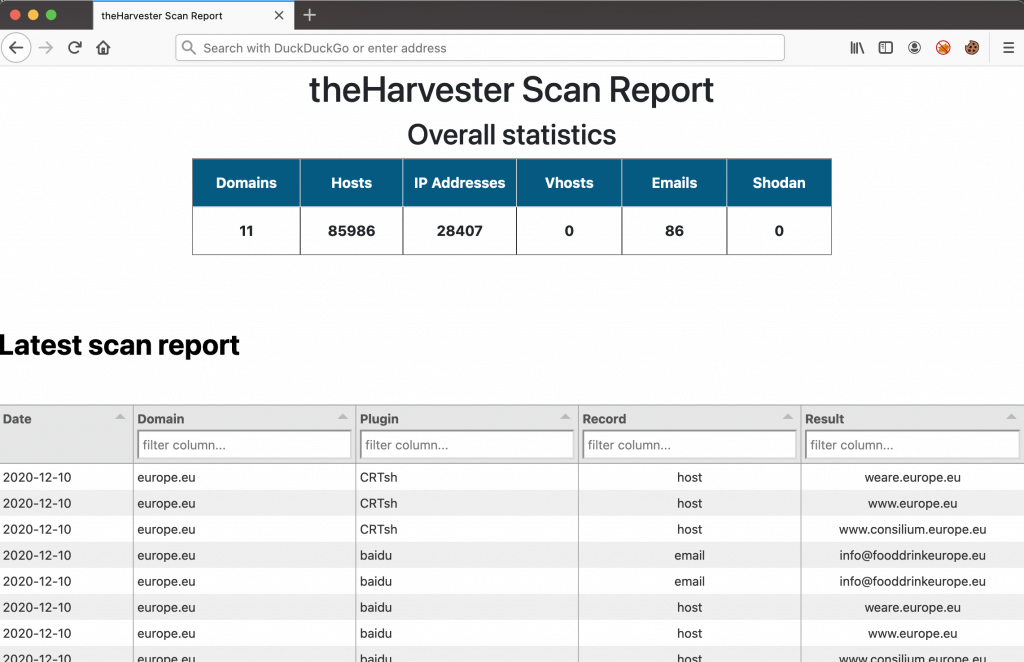
As you can see, it founds 5 email addresses, belonging to the domain pvv.nl. We will do the last example and we will save the output in an HTML file. This time we are using the domain europe.eu. This time we will use the parameter. So, theHarvester will use all of the possibilities of the tool to find information about this domain and save it to an HTML file.
1
python3 theHarvester.py -d europe.eu -b all -f ./europe.eu.html
There is a massive output saved to the HTML file. The contents of the HTML file are searchable in the table, you can filter on specific records, like email address and plugin.
I hope you’ve learned something about theHarvester.
Thanks for reading!
- T13nn3s